PS1: Discover Git and GitLab
Before starting to code, it is important to familiarize yourself with the tools that help organize your programming work.
Objectives
The goal of this session is to understand the following points:
git clone <remote repository address with PAT>(Personal Access Token and Configuring your workstation)git status(Local repository)git add <filename>(Local repository)git commit -m "<commit message>"(Local repository)git push(Local repository)git remote update(Remote repository and Synchronizing the local repository with the remote repository)git pull(Remote repository and Synchronizing the local repository with the remote repository).gitignore(Ignoring files)
These points are essential for the rest of the course, so you must master them!
Activating your GitLab account
As a student at the IUT of Orsay, you already have an account on the IUT Orsay GitLab.
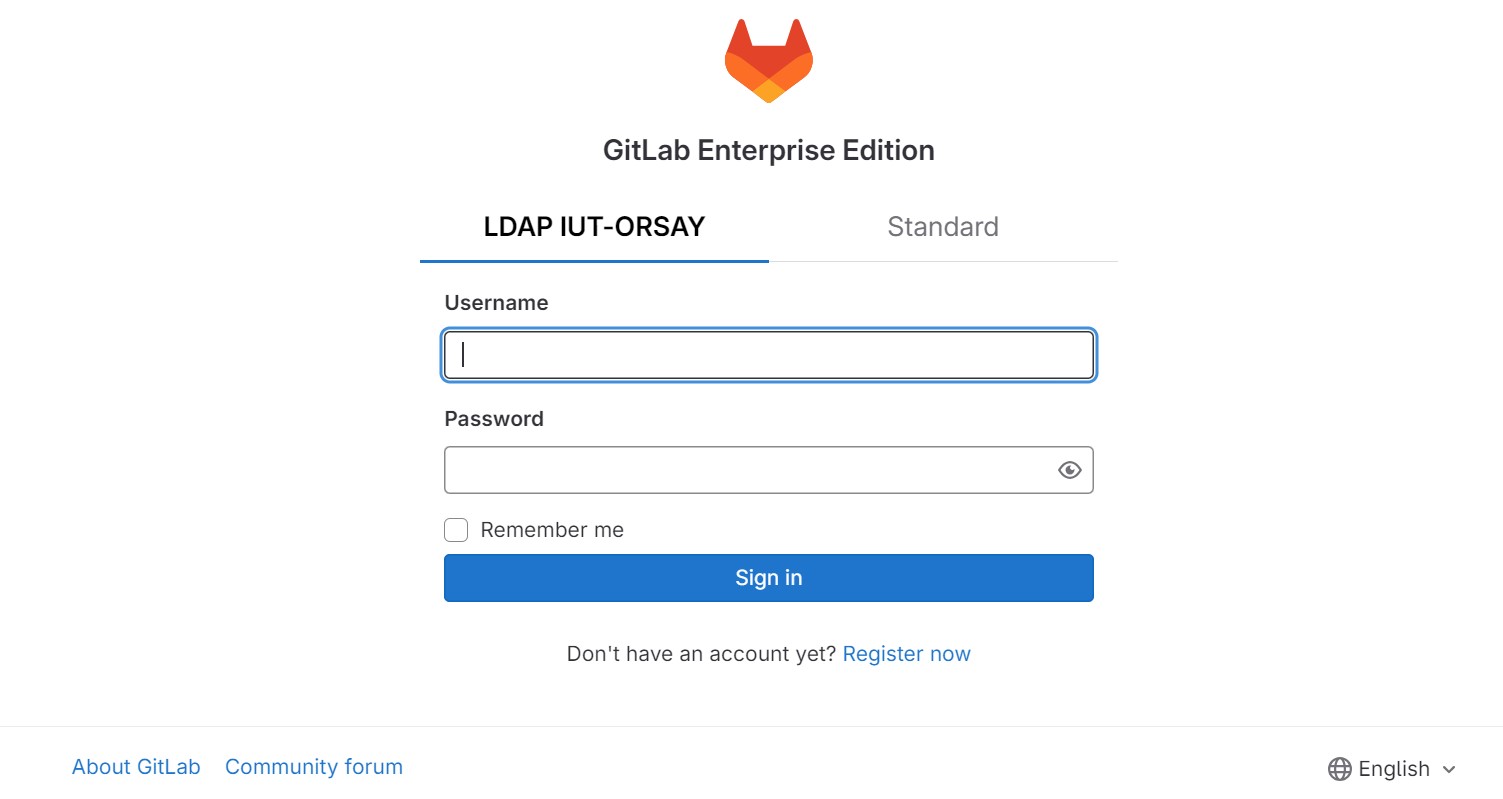
To log in, use your department username and password.
Personal Access Token
To establish a secure connection between your machine and the GitLab server at the IUT, we will use a Personal Access Token (PAT), which replaces the old password system.
To create a PAT:
- Go to your profile by clicking on your avatar (top left) and then Edit profile.
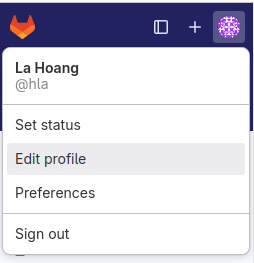
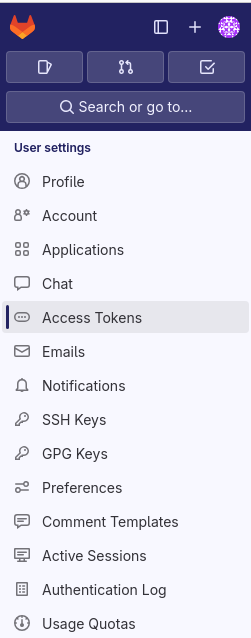
- In the left menu, click on Access Tokens.
- Add a new token by clicking on Add new token.

- Give the token a name that indicates the workstation being used (for example,
IUTOrsayif you’re working on a machine at the IUT).
- Set an expiration date of one year (the maximum allowed) from today’s date.
Expiration Date
Just as it is recommended to change your password regularly, the expiration date of the PAT requires generating a new one at regular intervals.
- Select all the scopes.
Scope
The benefit of limiting the scopes of a PAT is that in case of an attack, the attacker will only be able to perform actions allowed by those scopes, thus reducing the risk of compromise.
- Click on Create personal access token.
Creating a remote repository
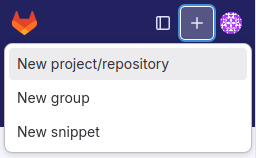
- Create your first repository by clicking on the
+button located at the top left of the screen.
- Create a blank project with the name
qualite-dev-s2-<first name>-<last name>(for examplequalite-dev-s2-hoang-la).
For the project URL, choose your short login in Users and the default URL provided.
Select the “Private” visibility option for your project and check the option to initialize the project with a README.
Click on Create Project.
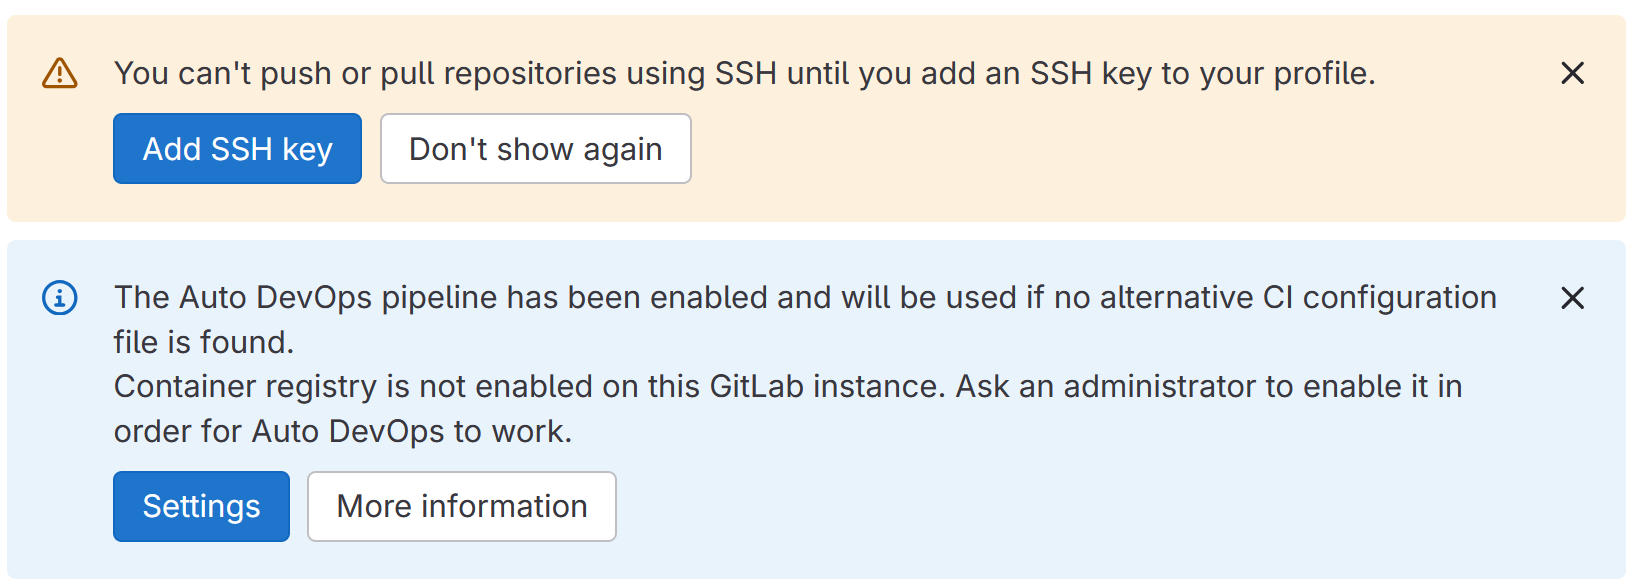
If you see the following messages, you can ignore them by clicking Don’t show again for the SSH key and
Xfor Auto DevOps.
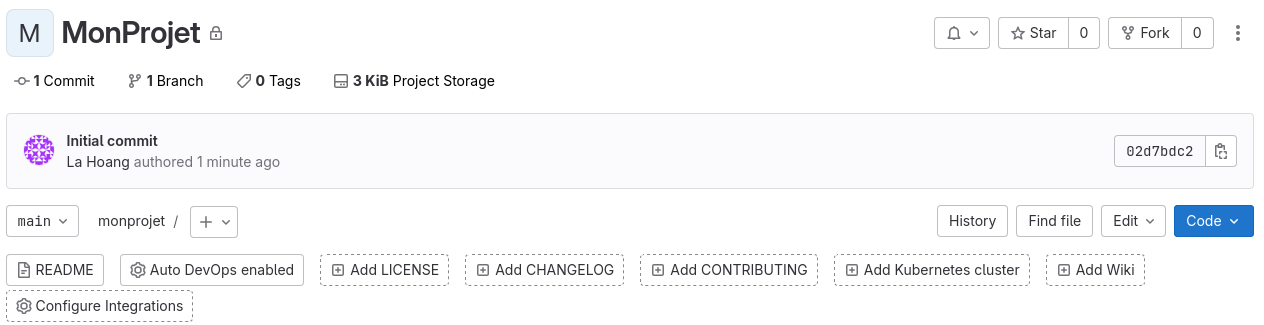
- Browse through the default README proposed by GitLab.
macOS
The Unix commands on Linux and macOS are very similar, but you may occasionally need to adapt some of them.
Windows
You can install the emulator Git for Windows.
Configuring your workstation
Your project has been created on the IUT server. Now, to work on this project from your local workstation, you need to configure it first.
- Copy the following lines of code into a terminal.
git config --global user.name "<Firstname> <Lastname>"
git config --global user.email "<University email>"
For example :
git config --global user.name "Hoang La"Then :
git config --global user.email "hoang.la@universite-paris-saclay.fr"Or :
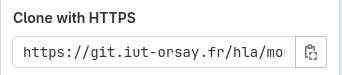
git config --global user.email "hoang.la-tmp@universite-paris-saclay.fr"You can now clone your remote repository to download it to your local workstation: 2. Click on the Code button on the right.
- Copy the URL under the Clone with HTTPS option.
Navigate to your preferred working directory (and open a terminal).
Enter the following command, pasting the copied address and adding your login and PAT in the appropriate places.
git clone https://<your short login>:<Personal Access Token>@git.iut-orsay.fr/<login of the creator of the project>/<project name>.gitFor example:
git clone https://hla:glpat-1234thisIsYourPAT5678@git.iut-orsay.fr/hla/monprojet.gitExpired or Lost PAT
If your PAT is expired or lost, you can execute the same command on your already cloned project by replacing clone with remote set-url origin, rather than recloning the project.
For example:
git remote set-url origin https://hla:glpat-1234thisIsYourNewPAT5678@git.iut-orsay.fr/hla/monprojet.gitLocal repository
A directory with the same name (local repository) has now been downloaded to your machine.
- Run the following commands.
cd monprojet/
ls
git status
The ls command allows you to list all the files in the directory, while git status shows the status of the repository. For now, the latter command should indicate that there is nothing to commit and your working directory is clean
- What do you observe when running the following commands?
touch my-first-file.txt
git status
Untracked files and changes
Git indicates that your working directory contains an untracked file or change.
Git is a version control tool: it allows you to keep track of changes made to the files in your project. However, not all files or changes are necessarily important. By default, the files you create or the changes you make are not tracked. Only the files and changes that are explicitly tracked will have their history recorded.
Add a line to
my-first-file.txt(for example,Hello World!).Ask Git to track the change to
my-first-file.txtby running the following command.
git add my-first-file.txt- Run the
git statuscommand again. What does it tell you?
git restore --staged
git restore --stagedIf you accidentally added a change or file, you can unstage the staged change using the command git restore --staged <nom du fichier>.
For example, run git restore --staged my-first-file.txt, then check the status of the repository with git status. Don’t forget to track the change again by using git add.
- Now, to create a history of the staged changes (in this case, the file
my-first-file.txtwith the lineHello World!), you need to commit these changes and add a descriptive message by running the commandgit commit -m "<descriptive commit message>".
For example:
git commit -m "Initial commit of my-first-file.txt saying Hello World!"- Re-run
git statusto check the status of your repository. What does it indicate?
Ready to push
The commit has been made. Your local version of the project is now ahead of the version on the GitLab server. You can now push these changes to synchronize the two versions.
Run
git push.Go to GitLab and check that the remote repository matches the local repository.
Remote repository
- Click on
my-first-file.txt. - Click on Edit.
- Select the option Open in Web IDE.
- Add a second line to this file (for example,
Hi!).
You will see a 1 on the left bar, indicating that a change has been made.
If you click on it, you will see a change regarding the my-first-file.txt file and the option to Commit and push to ‘main’.
- Add a commit message.
- Click on the Commit and push to ‘main’ button.
- Click on Continue when asked if you want to save it to the default branch (main).
Branches
The concept of branches in Git allows for maintaining a stable version of an application or project. All changes are made on branches other than ‘main’ (different versions of the repository) and later merged with the ‘main’ branch.
For example, in a project, the user interface (UI) and the logic part of the code can be separated into two distinct branches, other than ‘main’. The main branch (‘main’) will contain a stable and functional version of the project, while the other two branches will contain development versions.
In this course, we will not cover Git branches or other advanced Git features. You will only work on a single branch: ‘main’.
Synchronizing the local repository with the remote repository
Go back to your local repository and let’s assume that a collaborator made changes and then pushed them to the remote repository without you being notified.
- Run
git status. Do you notice anything unusual?
- Run
git remote update, thengit status. What do you see now?
git remote update
git remote updategit remote update updates the information about the remote repository. Now, git status is able to compare the local repository with the remote repository.
- Run
git diff origin/mainto see the differences between the two repositories.
Start with git remote update && git status!
git remote update && git status!In practice, when working on a project, it is common that someone else has modified part of the code between two work sessions. If you start a work session without checking the state of your repositories, you may face conflicts to resolve (for example, if you both modify the same parts of the code but differently).
Although we will discuss conflict resolution in this course, it is best to avoid them. That is why it is essential to always start with git remote update && git status before deciding what to do!
You can also run git diff origin/main to see exactly what changes have been made.
- To synchronize your local repository with the remote repository (which, this time, is ahead), run
git pull.
If the remote repository contains an incorrect version of the project...
In this case, it is not always desirable to run git pull. We will see how to handle this situation in the upcoming PSs.
- To view the commit history, run
git log. To exit the log, pressq(for ‘quit’).
Ignoring files
Create a file
hello-world.cpp(for example, withtouch hello-world.cpp).Open
hello-world.cppin your favorite code editor and copy the following code.
#include <iostream>
using namespace std;
int main() {
    cout << "Hello World!" << endl;
    return 0;
}- Compile the code with
g++ -o <filename> <filename>.cpp.
For example:
g++ -o hello-world hello-world.cpp- Run the executable
hello-worldwith the command./hello-world.
Executables are among the files that we want to ignore.
- Create the
.gitignorefile.
Why does .gitignore begins with a .?
.gitignore begins with a .?Files whose names start with a . are hidden files (they do not appear when using a file manager). These are often configuration files.
To display hidden files in a file manager, you can usually press Ctrl + H (for ‘Hidden’).
The .git directory you see in your project contains Git’s internal configuration files. It is important not to modify this directory, as it manages the tracking and history of your repository. Additionally, this directory is natively ignored by Git.
- Write the name of the executable
hello-worldin.gitignore.
If your editor has generated other files to ignore...
In this case, you need to add the names of these files to .gitignore.
Run
git add,git commit -m "<message>", andgit pushto send the.gitignorefile to the remote repository.Run
git status. What changes compared to usual?
Where are my untracked files?
Normally, since we didn’t add the executable hello-world with git add, git status indicates that there is an untracked file that might be important. However, thanks to the .gitignore file, Git recognizes that we’ve chosen to ignore hello-world and will never track changes to this file.
To finish...
Let’s finish this lab with a little reorganization.
- Create a directory
PS1/in your project and move everything except for.git,.gitignore, andREADME.mdto this directory.
You will maintain this project throughout the course by creating separate directories for each practical session (PS).
- Go back to the root of the project and run
git add ..
- Commit the staged changes with
git commit.
I forgot to add a commit message...
You are here because you ran git commit without specifying a message with the -m option (git commit -m "<message>"). Git is now forcing you to write a message by opening the following window.
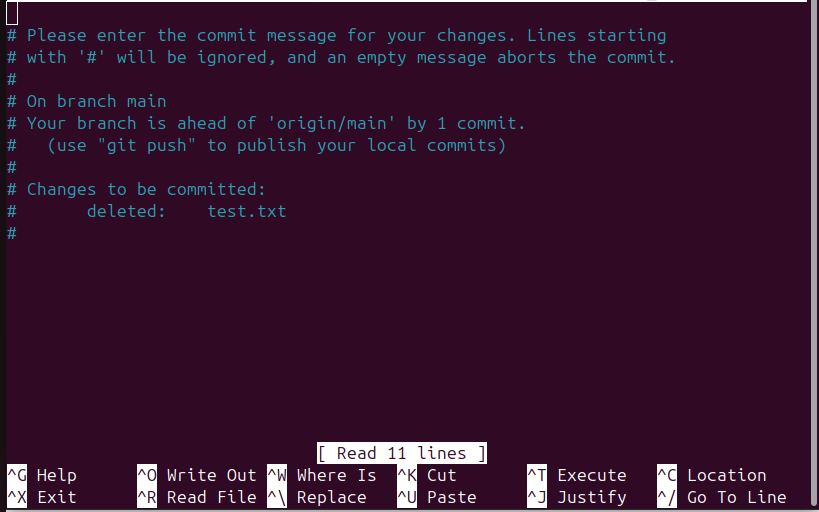
Here, we forgot to add a commit message for the deletion of a file named test.txt.
- Write your commit message on the first line.
If you are using the Nano editor (which looks like the screen above):
- Press Ctrl + X to exit.
- Press
yto confirm the changes. - Press
Enterto quit the window.
If you are using the Vim editor (Debian default editor at the IUT):
- Press
Escto exit insert mode. - Type
:wqto save the message and quit the window. - Press
Enterto execute the:wqcommand.
Since we will be ignoring many executables in the future, to avoid modifying .gitignore every time, we will use regular expressions to ignore files without extensions (executables).
- Replace the content of the
.gitignorefile with the following code.
*
!*.*
!*/I need to ignore other types of files...
You may have used an editor that generates other types of files to ignore, in addition to the extensionless files we have already excluded with the code above.
For example, if .o or .exe files have been generated and you want to ignore them in the future, add the following lines to your .gitignore file, instead of the ones suggested earlier:
**/*.exe
**/*.o**/means the search applies to the root as well as all directories and subdirectories.*.exeand*.owill ignore all files with these extensions.
Another example: if your editor has generated a build/ directory, you can add the following line:
build/This will exclude all content within directories named build, regardless of their location in the project.
You can even combine everything to ignore extensionless files, .o files, .exe files, and build/ directories (and their contents) with the following expressions for your .gitignore:
*
!*.*
!*/
**/*.exe
**/*.o
build/
Run
add,commit, andpushto synchronize your repositories.Add your instructor to your project by following the instructions below.
- Click on Manage on the left, then select Members.
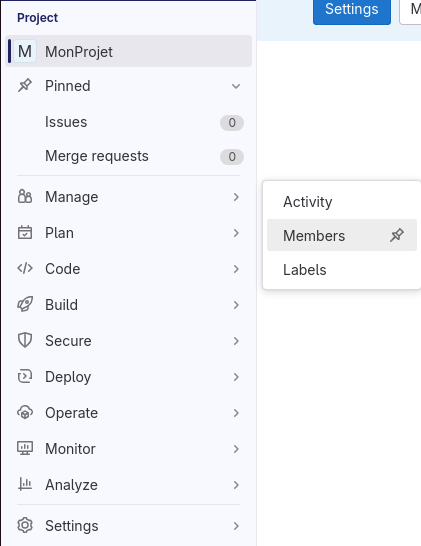
- Click on Invite members at the top right.
- Add your instructor with the Maintainer role, which gives them almost as much control over the project as the Owner role.
- Go back to the objectives and check the points you have mastered. Practice the commands and points you have not fully understood yet. Call your instructor over if necessary.
If unwanted files are lingering in your remote repository...
The same files are likely in your local repository (if not, you can first synchronize your repositories). You can then delete them with git rm and synchronize the repositories again.
git rm
git rmYou can use git rm <filename> to remove a file that has already been synchronized in both repositories. git rm works similarly to git add, but for deleting files. Afterward, you can perform a git commit followed by a git push, as usual, to push these changes (deletions).
A file that is only in the local repository can be deleted simply through a file manager or with the rm command (without git). If you have already added (git add) this file to staged changes, you can unstage it using git restore --staged <file name>.