Introduction to version control
An example of working alone
You break your program, which was working, the day before the deadline. You can no longer go back, and you do not remember the changes you made since the last time the program was working.
If only there were a piece of software capable of keeping the different versions you saved...
Getting started with Git
Create a new directory named
qualite-dev-s2-<first-name>-<last-name>by replacing<first-name>and<last-name>with your first name and last name (for example,qualite-dev-s2-hoang-la).
Go to this new directory and create a file named
my-first-file.txtby running the following command.
touch my-first-file.txtEdit
my-first-file.txtusing the editor of your choice and add the following line:Hello World!
We now want to save this first version of our project.
Run the following command.
git initgit init
git initThe git init command tells Git to start managing the different versions of the contents of the current directory (as well as any subdirectories).
You can open a file manager and press Ctrl + H (for “Hidden”) to display hidden files and directories. You should see that a .git/ directory has been created: this directory contains the information required to manage the versions of your project.
You must never touch it, otherwise you risk losing your project history! This directory must always remain at the root of the project (in qualite-dev-s2-<first-name>-<last-name> and not in a subdirectory such as Lab1/, for example).
Run the following commands, replacing the information with your own.
git config --global user.name "<First name> <Last name>"
git config --global user.email "<University email>"
For example:
git config --global user.name "Hoang La"Then:
git config --global user.email "hoang.la@universite-paris-saclay.fr"git config
git configThe git config command is used to configure Git settings.
The --global option is used to modify Git’s global settings (they will also apply when you manage other projects with Git).
The user.name and user.email options allow you to configure your name and email address, so that you can be identified when working collaboratively on projects.
Three states of the same directory
Working Tree, Staging Area and Local Repository
To use a version control system properly, we must adopt a specific workflow. Just like in a kitchen, we need three distinct work areas:
Our workbench, a draft space where we can freely modify whatever we want: Working Tree.
Our plating table, where dishes are plated, checked, and where final mistakes can still be corrected: Staging Area.
Our pass, where the dish is validated and ready to be served (saved): Local Repository (often abbreviated as Local Repo).
Run the following command. What do you observe?
git statusgit status
git statusThe git status command shows the current state of our directory.
In this case, it should indicate the presence of untracked files or changes and suggest adding them using the git add command.
Run the following command.
git add my-first-file.txtgit add
git addThe git add command tells Git that we want to track the modification made to the file my-first-file.txt.
This adds the modification to the Staging Area: a modification made in the Working Tree (workbench) is considered a draft, whereas a tracked modification (a dish placed on the plating table) is a modification that we may want to save in the version history.
Run the following command. What do you observe?
git statusChanges to be committed
All changes in our directory are now tracked by Git. It indicates that these changes are ready to be committed. In other words, the dish on the plating table can be sent to the pass to be served.
Run the following command.
git commit -m "The first version of my project"git commit
git commitThe git commit command tells Git that we want to validate (save) the changes present in the Staging Area and record them in the Local Repository. They now constitute a version of our project.
The -m option allows you to associate a commit message, which describes the saved version.
Run the following command.
git loggit log
git logThe git log command displays the version history of our project. You should see your commit message, as well as your name and email address, which identify you as the author.
The three states of the same directory.
Run the following command and observe the result.
git statusAdding and unstaging changes
Check git status regularly!
git status regularly!You should regularly run git status to know the state of your Working Tree and Staging Area.
You can also use git log to inspect the state of your Local Repo.
This will no longer be reminded later, except when learning new commands.
Modify the contents of
my-first-file.txtby replacing the lineHello World!withHi World!.Create a second file
my-second-file.txtand add the lineHi there!to it.Add all changes using one of the following commands.
git add my-first-file.txt my-second-file.txtor
git add .Adding multiple changes
The git add command can be used to add multiple files with a single command.
git add . adds all changes present in the current directory.
Imagine that you made a mistake and that you no longer want to keep Hi World! in my-first-file.txt. Even if the modification is tracked (present in the Staging Area), it is not too late!
Run the following command.
git restore --staged my-first-file.txtgit restore --staged
git restore --stagedIf you added a modification or a file by mistake, you can unstage the added modification using the git restore --staged <file name> command.
It is now time to save the second version of your project.
Run the following command.
git commitI forgot to add a commit message...
You are here because you ran git commit without specifying a message using the -m option (git commit -m "<message>"). Git therefore forces you to write a commit message by opening the following window.
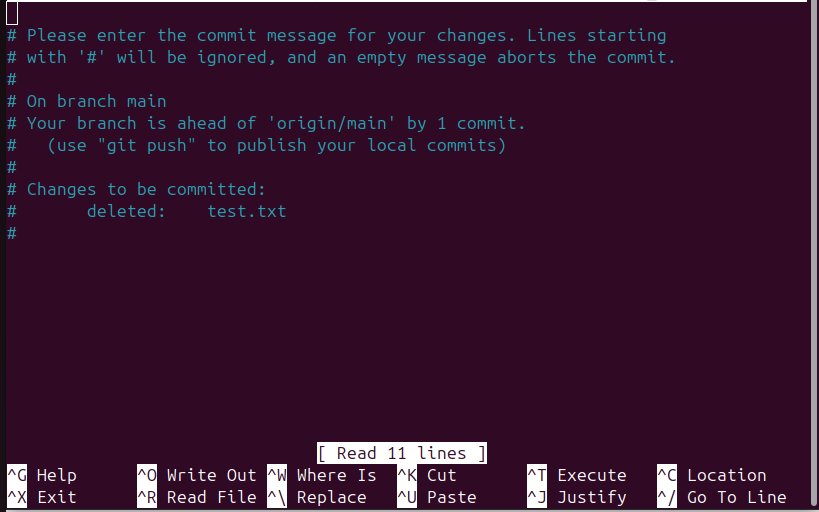
Here, we forgot to add a commit message for the deletion of a file named test.txt.
Write your commit message on the first line.
If you are using the Nano editor (which looks like the screen above):
Press Ctrl + X to exit.
Press
yto confirm the commit message changes.Press
Enterto close the window.
If you are using the Vim editor (the default editor on Debian at the IUT):
Press
Escto leave insert mode.Type
:wqto save the message and exit.Press
Enterto execute the:wqcommand.
You now have a second version of your project in the version history.
The version stored in the Local Repo therefore contains the files my-first-file.txt and my-second-file.txt with the lines Hello World! and Hi There! respectively, while the “draft” version in your Working Tree contains the line Hi World! in my-first-file.txt.
To conclude…
Let’s finish this lab with a small reorganization.
Create a
Lab1/directory as a subdirectory of your project root.
Creating an empty directory is not a change
If you check git status, you will notice that Git does not report any change related to the creation of Lab1/. As long as a directory is empty, it is not taken into account by Git.
Move everything (except
.git/) into theLab1/directory.
You will maintain this project for the rest of the course by creating separate subdirectories for each lab.
Go back to the project root and run
git add .
File path changes
A change in a file path, for example,
qualite-dev-s2-<first-name>-<last-name>/my-first-file.txtbecoming
qualite-dev-s2-<first-name>-<last-name>/Lab1/my-first-file.txtis interpreted by Git as the deletion of the old file
qualite-dev-s2-<first-name>-<last-name>/my-first-file.txtand the creation of the new file
qualite-dev-s2-<first-name>-<last-name>/Lab1/my-first-file.txtCommit the tracked changes using
git commit.
Keeping a readable history
It is recommended to create well-structured commits, which implies:
writing clear and precise commit messages;
using concise messages, for example:
First commit,Add <feature>,Fix <error>, etc.;adding more details if necessary.
It is not necessary to write long narratives, but your commit messages must be explicit enough to help you navigate your history easily. You will be assessed on your ability to maintain a structured and readable history of your work.
If you make distinct and unrelated changes, create separate
git addandgit commitsteps (grouping changes with a common theme), or usegit add .andgit commitas soon as you finish working on a part of the project before moving on to another.
Quiz!
Do not forget to complete the lab quiz on Moodle!